CBL, MTS, and STB buttons perform the same function controlling the set top box. This button should light up red when pressing buttons on the remote. If any of the button options do not light up red, then select the CBL, MTS, or STB button and proceed.
1. If no video is showing, confirm that the television is on the correct input. Refer to the remotes on page 3 to identify which remote you have to determine where your input button is. To change the input, press the "tv/"video" button. If you are unsure of what input the box was installed on, you can refer to the sticker on the back of your remote or on top of your set top box. This will tell you what room the remote belongs in, and what input the set top box was programmed on.
2. If your remote is not changing channels or responding to the buttons that are being selected, please refer to the STB, MTS, or CBL button to ensure it is turning red. If it is not red, press the STB, MTS, or CBL button and then proceed with changing the channel, etc. That button should now flash red as you push buttons on the rest of the remote.
3. If video still doesn't appear, you should unplug the set top box. To do this, find the small power cord plugged into the back of your box.
4. If you turn your TV on and see a blue screen that flashes "press OK to watch TV"; this means your TV is ON, but your set top box is not.
Press OK on your remote, this will turn the power to your settop box on. Video should appear shortly. If this doesn't work, make sure the STB, MTS, or CBL button is lighting up on the remote *NOTE: The label depends on what remote you have, refer to the remote section to see which remote you have.
4. If your TV says that the signal has been lost, this means that the set top box could have lost its connection to the main equipment. You should first try to unplug the set top box (see power cord picture on page 4). If this does not resolve the signal problem, please call the Business office for further troubleshooting.
1. Make sure the Set Top Box is plugged into power.
2. Check Power button.
a. A green light should appear around the "POWER" button.
b. If a red light appears, check the Calix Gigacenter/ONT.
c. Make sure equipment is plugged into power
d. Please call our office if none of the above options have helped. Thank you.
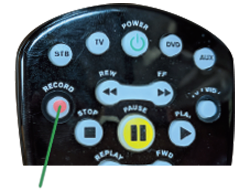
1. Press "GUIDE" button.
2. Find program that you want to record by scrolling through the guide. (Press up and down arrows to scroll through channels. Press right arrow to see future programming).
3. Highlight the program you want to record.
4. Press "RECORD" button once to record that program one time; press it twice to set up a series of recordings, press it three times to cancel recording.
1. Press "MENU" button.
2. Scroll down to "RECORDED TV" and hit "OK". At top of page - scroll to the left and select "ADD RECORDING"
3. Select to record program or services from "GUIDE" if you want to find the program on the channel guide or select "search" to find the program by name.
4. If using "SEARCH":
a. Type in the name of the program by scrolling to the letters shown and pressing "OK" after each letter.
b. Once your program shows at the right, select it and then select the specific program to record.
c. Select "RECORD EPISODE" or "RECORD SERIES" and select your recording settings.
d. Select Record at the left.
e. Press "EXIT" button.
5. If using "GUIDE":
a. Highlight the program you'd like to record and press "RECORD" button.
b. Press "EXIT" button.
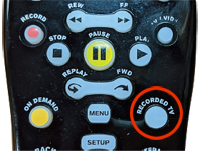
1. Press "RECORDED TV" button.
2. To alter a one-time recording use the arrow button to scroll to "SCHEDULED".
a. Use arrow button to scroll down to the recording you'd like to alter and press "OK".
b. Scroll through the options at the left and select what you'd like to change.
c. Select "SAVE CHANGE" when done.
d. Press "EXIT" button.
3. To alter a series recording use the arrow button to scroll to "SERIES".
a. Use arrow button to scroll down to the recording you'd like to alter and press "OK".
b. Scroll through the options at the left and select what you'd like to change. Select "SAVE CHANGES" when done.
c. Press "EXIT" button.
1. Press "RECORDED TV" button.
2. Use arrow button to scroll down to the program you'd like to watch and press "PLAY" on left side.
3. Press "STOP" button to stop watching a recorded program. Scroll down to the desired option and press "OK".
When setting recordings, you can choose to keep the recording until space is needed (which means your recordings will automatically be deleted when space is needed) or you can choose to keep the recording until you erase it. To check this setting on each recording, follow the instructions for "Altering a Scheduled Recording" and see what is selected under the "KEEP UNTIL" option.
1. Press "RECORDED TV" button.
2. Use arrow button to scroll down to the program you'd like to delete and press "OK".
3. Scroll down to "ERASE", on left side, and press "OK".
4. You will be asked if you are sure you want to erase. Select "ERASE" or "DON'T ERASE" and press "OK".
5. Press "EXIT" button.
1. Press "RECORDED TV" button.
a. Push the "MENU" button.
b. Arrow down to "SETTINGS" and press "OK".
c. Highlight "TELEVISION" and push "OK".
d. Highlight "PRIMARY GUIDE STYLE" and push "OK".
e. Arrow right once.
f. Pick the Guide style you want.
i. Grid Guide - List the channels on the left and the program information on the right.
ii. Channel Lineup - lists the channels at the top and the program information below it.
iii. "On Now Guide" - lists what is currently playing only.